Starting a new project today.... It's a shop project!!! Ok so I got a lathe and quickly realized that it will need a good place to live in my shop. There are some requirements that it will need to have:
1) Must be Heavy and Sturdy for the lathe.
2) Must have storage for the tools and accessories.
3) Must be easy to clean.
4) Must be easy to move.
Ok with that in mind here is what I have come up with:
This first image shows the basic stand, main carcass will be made using a combination of 4x4's and 2x4's with a double layer of plywood for the top, the edging for the top will be Cherry wood. The joinery will be traditional Mortise and Tenon and the top will be screwed on to the base from the bottom.
Heavy and Sturdy CHECK!
Easy to Clean CHECK!
Then I will make a cabinet much like the ones in my workbench made with plywood sides and drawers and all the exposed edges will have Cherry edging.
Plenty of storage CHECK!
The cabinet will fit in the open area of the stand to become a all in one Lathe Unit.
Heavy and Sturdy CHECK!
Plenty of Storage CHECK!
Easy to Clean CHECK!
Easy to Move...Hmm.
Well I will probably be using the same casters I have on my workbench, the great part about them is that they lift the cabinet up when it needs to be moved, but the move out of the way so that the cabinet will rest on its feet and stay sturdy, the only downside is the casters cost almost as much as the rest of the stand put together but still not to bad.
Easy to Move CHECK!
Ok now for a shopping list:
STAND
2 - 4"x4"x8' Lumber = $17
2 - 2"x4"x8' Lumber = $6
2 - 40"x16"x3/4" Baltic Birch Plywood = $25 (I had half a sheet already but here you can spend a lot or save a lot depending on the quality of plywood you use.)
1 - 4"x3/4"x8' Cherry board = $15 (Again save a lot if you use cheaper wood)
CABINET
1 - 4'x4'x1/2" Plywood = $25 (Again here you can save money depending on the quality of plywood.)
CASTERS
1 - Pack of 4 workbench casters = $65 (These I will be buying next time they go on sale)
I started by cutting down the lumber to lengths.
LEGS, using 4x4's I cut them to 30" long using the miter saw.
STRETCHERS, using the miter saw again I cut from the 2x4's and 4x4's
Long ones are 32" (they will be 30" long and have 1" tenons on each size).
Short ones are 7.5" (they will be 5.5" long and have 1" tenons on each size)
TOP, using the plywood I cut 2 pieces to 40"x16" and glued them together, once dry I will be putting the cherry edging all around this top.
Here is a pic of all the rough milled lumber sitting onto of my workbench which basically shows what this stand will look like. Except no vises, to dog holes, no space between top and cabinet for holdfasts, basically much easier and simpler...
Ok so will all the boards rough milled and ready for joinery, this is a good place to end this post.
Stay tuned for the next phase of the build.
Saturday, April 25, 2015
Wednesday, April 15, 2015
Tool Chest Build 08 - Finish and Hardware
Ok so I know it's been a while since the last post but there is a reason, well 2 reasons actually... 1) I bought a lathe and have been having a blast turning stuff... and 2) I had to let the finish dry before I could add the hardware and take the final pics.
Ok where did I leave off... oh yeah I had finished building everything and pre finished the lid. After all that I sanded and sanded and sanded... making sure everything was fitting perfectly and looked the way I wanted it to.
After a good sanding I cleaned up the wood dust with mineral spirits and let that dry then I started the finish... what finish should I use? First I thought a shinny lacquer, but then I started thinking about what this case is for... a tool chest... well then it should have a much simpler finish so I decided to go with an Boiled Linseed Oil base and then a Shellac coat over that and that is the reason it took so long. I put a coat of BLO (Boiled Linseed Oil) and let that dry for 3 days, then I put a second coat of BLO and I was planning on letting that dry for at least a week... well 1 week turned into 2 weeks and 2 weeks into a little more, but after I got back to it, the BLO was nice and dry and I added a couple of coats of Shellac which dries really quickly so that was awesome.
BLO finish looks amazing, if you like a natural non gloss wood finish, which I do.
This project took up my assembly table for 2 weeks and I really wanted to be able to use the table so top priority became finishing this project... I had a great time making this tool chest but I am glad it is finally done.
I hope you all enjoyed this process as much as I did, Oh wow I almost forgot to talk about the hardware... Its really simple actually, I used 2 Non-Mortise hinges and 2 drawer pulls on each drawer, all in a antique bronze color.
Here is the finished piece in all its glory...
Can't wait to start a new project... Not sure what is coming next but I have a feeling its going to be a set of tools, tools you say? Well I did just buy a lathe and I think I want to make a set of Carbide tools... well actually I will buy the little carbide cutters but I will make the tools.
Ok where did I leave off... oh yeah I had finished building everything and pre finished the lid. After all that I sanded and sanded and sanded... making sure everything was fitting perfectly and looked the way I wanted it to.
After a good sanding I cleaned up the wood dust with mineral spirits and let that dry then I started the finish... what finish should I use? First I thought a shinny lacquer, but then I started thinking about what this case is for... a tool chest... well then it should have a much simpler finish so I decided to go with an Boiled Linseed Oil base and then a Shellac coat over that and that is the reason it took so long. I put a coat of BLO (Boiled Linseed Oil) and let that dry for 3 days, then I put a second coat of BLO and I was planning on letting that dry for at least a week... well 1 week turned into 2 weeks and 2 weeks into a little more, but after I got back to it, the BLO was nice and dry and I added a couple of coats of Shellac which dries really quickly so that was awesome.
BLO finish looks amazing, if you like a natural non gloss wood finish, which I do.
This project took up my assembly table for 2 weeks and I really wanted to be able to use the table so top priority became finishing this project... I had a great time making this tool chest but I am glad it is finally done.
I hope you all enjoyed this process as much as I did, Oh wow I almost forgot to talk about the hardware... Its really simple actually, I used 2 Non-Mortise hinges and 2 drawer pulls on each drawer, all in a antique bronze color.
Here is the finished piece in all its glory...
Can't wait to start a new project... Not sure what is coming next but I have a feeling its going to be a set of tools, tools you say? Well I did just buy a lathe and I think I want to make a set of Carbide tools... well actually I will buy the little carbide cutters but I will make the tools.
Sunday, March 22, 2015
Tool Chest Build 07 - The Lid
Ok so I started to work on the lid... problem is I lost the photos of the beginning parts but I will explain and its pretty easy so it should work out ok.
First remember that piece of Crotch Walnut veneer I teased in part 5? Well I took 2 sheets of that and glued it to each side of a piece of plywood, this is a very easy process of adding a whole bunch of glue to the plywood and sandwiching the veneer to it... then applying something really heavy and let it dry. Once that piece was completely dry I cut it to size and pre-finished it.
Next I cut the sides that will make the frame of the lid out of Ash, they are 2" wide, I made a 1/4"groove down the middle of the boards so I could slip the panel into and the joinery would fit nice and tight.
Ok in this picture you can see how it all came together, this is still a dry fit just to make sure everything fit and to adjust anything that might need it. Also you can see why I decided to pre-finish the panel, since the panel is fit in a groove about 1/2" deep if I were to finish it after I assembled it I would not be able to put finish in the edges and if there was any wood movement it has a possibility of showing where there is no finish.
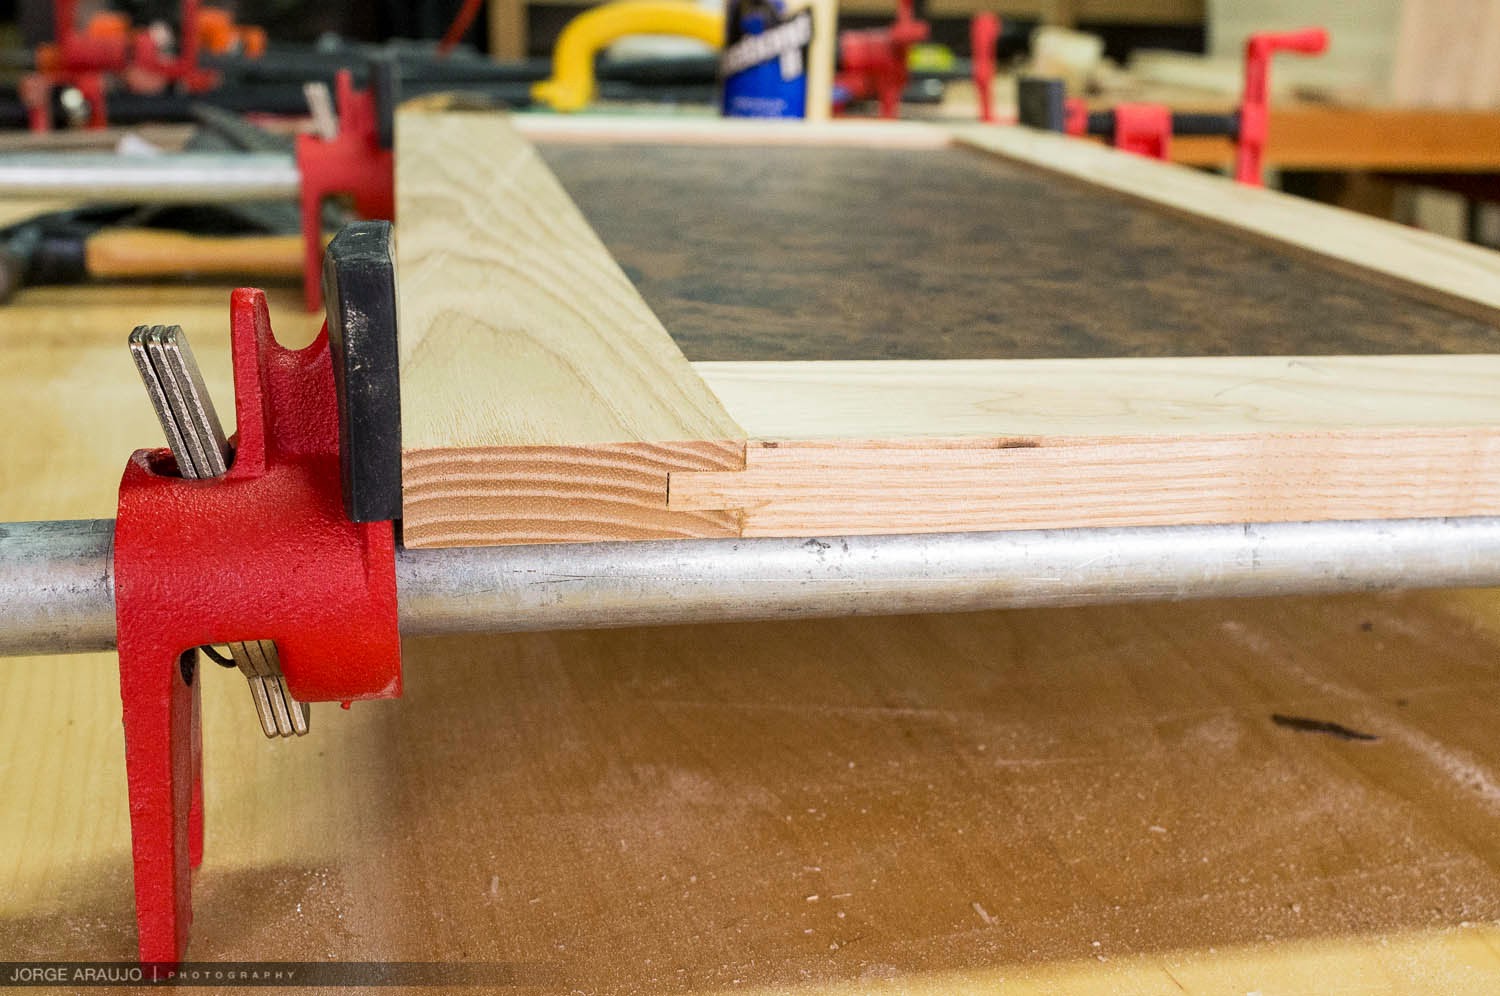
In this next picture you can see how the pieces are joined together. All 4 side pieces get the groove and the short side pieces get a tenon on the ends that fit into the groove of the long pieces. Also the Walnut panel fits into the grooves on all 4 sides. The tenons I started by making the a little long and cutting them down little by little until they fit perfectly in the groove so there would be no gap. Ofcourse there is still a hairline gap, but I can live with that cuz the glue should expand the wood and fill that gap.... I hope.
Ok well now the glue up...It went pretty well, it was an easy glue up because only the sides get glue the panel "floats" in the groove" now with the plywood and veneer construction I used you don't have to leave it floating because plywood is very stable and doesn't move. The floating panel is more a practice used when you are putting a solid wood panel in the frame, so it has room to expand and contract with the humidity, but Its a good practice to get used to even with plywood and since I made the groove fit tight around the panel it doesn't rattle, it's not loose just not glued.
Now that the lid is done I will be moving onto sanding, sanding and more sanding and then applying the finish, which is going to be just a simple oil finish for the entire piece, and maybe a coat of danish oil at the end to give it a little protection.
Stay tuned cuz next post will (should) have the finish applied and the hardware installed...
First remember that piece of Crotch Walnut veneer I teased in part 5? Well I took 2 sheets of that and glued it to each side of a piece of plywood, this is a very easy process of adding a whole bunch of glue to the plywood and sandwiching the veneer to it... then applying something really heavy and let it dry. Once that piece was completely dry I cut it to size and pre-finished it.
Next I cut the sides that will make the frame of the lid out of Ash, they are 2" wide, I made a 1/4"groove down the middle of the boards so I could slip the panel into and the joinery would fit nice and tight.
Ok in this picture you can see how it all came together, this is still a dry fit just to make sure everything fit and to adjust anything that might need it. Also you can see why I decided to pre-finish the panel, since the panel is fit in a groove about 1/2" deep if I were to finish it after I assembled it I would not be able to put finish in the edges and if there was any wood movement it has a possibility of showing where there is no finish.
In this next picture you can see how the pieces are joined together. All 4 side pieces get the groove and the short side pieces get a tenon on the ends that fit into the groove of the long pieces. Also the Walnut panel fits into the grooves on all 4 sides. The tenons I started by making the a little long and cutting them down little by little until they fit perfectly in the groove so there would be no gap. Ofcourse there is still a hairline gap, but I can live with that cuz the glue should expand the wood and fill that gap.... I hope.
Ok well now the glue up...It went pretty well, it was an easy glue up because only the sides get glue the panel "floats" in the groove" now with the plywood and veneer construction I used you don't have to leave it floating because plywood is very stable and doesn't move. The floating panel is more a practice used when you are putting a solid wood panel in the frame, so it has room to expand and contract with the humidity, but Its a good practice to get used to even with plywood and since I made the groove fit tight around the panel it doesn't rattle, it's not loose just not glued.
Now that the lid is done I will be moving onto sanding, sanding and more sanding and then applying the finish, which is going to be just a simple oil finish for the entire piece, and maybe a coat of danish oil at the end to give it a little protection.
Stay tuned cuz next post will (should) have the finish applied and the hardware installed...
Saturday, March 7, 2015
Tool Chest Build 06 - Dovetail Drawers
Well it's been a while since my last post... life got in the way a bit... actually I spent the last couple of weekends getting my car fixed and had no time to be in the shop. But now my car is all fixed (thanks Mom!) and I have gotten back into my shop. Ok so last time I said I would probably work on the top next but I decided to tackle the drawers first instead because I might change the top design a bit.
First I milled up the walnut drawer fronts using my planer to get the stock flat and then the table saw to cut them to rough lengths... and when I say rough lengths I usually mill them about 1/16 larger then they need to be so I can finesse with my hand tools.
Then I used my plane and shooting board to get them square and to final size, final size being a tight fit into the drawer slot, I make sure they are super tight so that once the whole drawer is finished I can plane them down and give it some breathing room, usually about 1/64" side to side and 1/32" top to bottom to allow some expansion and not get locked in during the humid months.
After the drawer fronts are fit I moved onto the blind dovetail sides. First I cut the tails on the side boards and then using those I mark the sides of the front with a knife you can see the fine lines on the picture, using a saw I rough cut and I use chisels to finish it. First I chop the bottom a bit then chop down about 1/16" at a time.
Here is a picture of the final mortise all cleaned and at this point I am about to fit the side to it so I was hoping it fit.
Oh good it fit! There is a small little gap on the right side but hopefully it will swell a little with the glue and fill the gap. But other than that I impressed myself...
Hey the glue did swell it a little and the gap is not so noticeable. Want to mention that before I glued them up I did drill holes for the drawer pulls and counter sunk the backs so the screw is hidden. Do it before the glue up because it's harder after, (learned that one the hard way last time LOL!)
I glued up the sides, back and front and then slid the bottom panel in and we have a completed drawer, at this point I fit it into the drawer slot and it was way to tight, but I was expecting that, so I took the hand plane and shaved down all the sides, tops and bottoms fitting it every few shavings.
Now for the final fitting, sliding in perfectly and fit really nice. I was so excited to see the fit of the closed drawer that I made a super rookie mistake, and It is a great tip to share... wait for it...
Ok so this next picture shows the final fit I am really excited that they fit so perfect. Ok now for the tip... see those pieces of tape, well when I first fit the bottom drawer it was stuck, since it has no pulls yet I couldn't pull it back out....ooops, I actually had to do a lot of work with a chisel, ruler, tape and finally what saved me was that I had drilled the holes for the pulls and I was able to use a coat hanger to pull the drawer back out... reminded me of trying to open a car when you locked your keys in it back in the day. Then I put tape on the bottoms so I had temporary pulls and could keep fitting and be able to pull it out...LOL!
Now I am waiting for the drawer pulls they are coming from the interweb, and will be starting the lid as soon as I decide on the design... Stay tuned.
First I milled up the walnut drawer fronts using my planer to get the stock flat and then the table saw to cut them to rough lengths... and when I say rough lengths I usually mill them about 1/16 larger then they need to be so I can finesse with my hand tools.
Then I used my plane and shooting board to get them square and to final size, final size being a tight fit into the drawer slot, I make sure they are super tight so that once the whole drawer is finished I can plane them down and give it some breathing room, usually about 1/64" side to side and 1/32" top to bottom to allow some expansion and not get locked in during the humid months.
After the drawer fronts are fit I moved onto the blind dovetail sides. First I cut the tails on the side boards and then using those I mark the sides of the front with a knife you can see the fine lines on the picture, using a saw I rough cut and I use chisels to finish it. First I chop the bottom a bit then chop down about 1/16" at a time.
Here is a picture of the final mortise all cleaned and at this point I am about to fit the side to it so I was hoping it fit.
Oh good it fit! There is a small little gap on the right side but hopefully it will swell a little with the glue and fill the gap. But other than that I impressed myself...
Hey the glue did swell it a little and the gap is not so noticeable. Want to mention that before I glued them up I did drill holes for the drawer pulls and counter sunk the backs so the screw is hidden. Do it before the glue up because it's harder after, (learned that one the hard way last time LOL!)
I glued up the sides, back and front and then slid the bottom panel in and we have a completed drawer, at this point I fit it into the drawer slot and it was way to tight, but I was expecting that, so I took the hand plane and shaved down all the sides, tops and bottoms fitting it every few shavings.
Now for the final fitting, sliding in perfectly and fit really nice. I was so excited to see the fit of the closed drawer that I made a super rookie mistake, and It is a great tip to share... wait for it...
Ok so this next picture shows the final fit I am really excited that they fit so perfect. Ok now for the tip... see those pieces of tape, well when I first fit the bottom drawer it was stuck, since it has no pulls yet I couldn't pull it back out....ooops, I actually had to do a lot of work with a chisel, ruler, tape and finally what saved me was that I had drilled the holes for the pulls and I was able to use a coat hanger to pull the drawer back out... reminded me of trying to open a car when you locked your keys in it back in the day. Then I put tape on the bottoms so I had temporary pulls and could keep fitting and be able to pull it out...LOL!
Now I am waiting for the drawer pulls they are coming from the interweb, and will be starting the lid as soon as I decide on the design... Stay tuned.
Wednesday, February 18, 2015
Tool Chest Build 05 - Glue Up and Clean Up
So after finishing up all the parts and giving them a light sanding... mostly to the inside parts because they will be hard to get to after the glue up I started to glue up and parts, I followed the sequence I had planned out in the last post (Bottom, back, divider, back, divider, back and front) I clamped all the pieces together... I am really happy I used the liquid Hide glue because this glue up took just under 30 minutes and regular glue would have set up way before that.
Here are a few pictures of the glue up.... "YOU CAN NEVER HAVE TOO MANY CLAMPS"
The Front:
The Back:
The Top:
Ok now to let it dry... 24 hrs later... and I was able to take the box out of the clamps, looking at the piece after removing it from the clamps you can see all the places I left proud so that I could flush it up later... of course this is when I realized that I could have left less things oversized and have less work at this point but it's ok... it will look good... I think?
Here are the pictures of the box straight from the clamps:
The front, you can see lots of glue to clean up and lots of joints to flush up:
The back, more of the same:
The top, for sure could have left less material above but should be easy to plane down... I think?
Divider detail... this one is interesting... at this point I couldn't tell if it was just proud or if the joint wasn't tight... here's hoping...Gulp!
Ok now another 24hrs... had to go to work, but I was now ready to start planing down the surfaces and get this all cleaned up... or so I thought... Damn I have to sharpen my planes... so I took out my diamond stones and started to sharpen all 3 planes I was going to use... 1000 grit... 4000 grit... 8000 grit and then a little stropping on leather and the blades are ready. Now to plane the box... Damn how do I clamp something this big to the bench so it doesn't move... this way, NO! that way, NO... hmm? Oh I know I used a clamp down to the top of the bench and the bench vise to hold the clamp (wish I took a picture but I didn't). Ok started planing and found that ASH (wood I'm using) planes really easy as long as you go with the grain not against it, ( I think there is a phrase about this).
Ok now the pictures after the initial clean up... at this point I have only used planes and a little sandpaper to get to my initial cleanup... still will have lots more to sand once the whole thing is complete.
The Front, not too bad, most joints look good... maybe little gaps but I can live with that.
The Back, Oh good the joints look tight.
The Top, this worked out just as I thought it would, but I am now out of breath... and my shoulders are getting tired next time leave less material to flush up dummy...
Ah the Dovetails, actually most of them turned out really nice and tight, way better than I thought they would... but of course there is this one...Damn $#@%#$, son of a $^%@$@... Oh well it will stand there taunting me forever... FCUK!!!!! Any ideas on wood filler? This is how you know it was done by hand right? NO!!!! LOL all this aside I'm happy with the box so far and well there is nothing I can really do so be it!
I haven't decided what I will be working on next the Frame and Panel Lid or the Drawers yikes more dovetails... maybe the lid first then.
A little sneak peak at the Walnut veneer I will be using both for the lid panel and the drawer fronts... really cool stuff.
STAY TUNED!!!!
Here are a few pictures of the glue up.... "YOU CAN NEVER HAVE TOO MANY CLAMPS"
The Front:
The Back:
The Top:
Ok now to let it dry... 24 hrs later... and I was able to take the box out of the clamps, looking at the piece after removing it from the clamps you can see all the places I left proud so that I could flush it up later... of course this is when I realized that I could have left less things oversized and have less work at this point but it's ok... it will look good... I think?
Here are the pictures of the box straight from the clamps:
The front, you can see lots of glue to clean up and lots of joints to flush up:
The back, more of the same:
The top, for sure could have left less material above but should be easy to plane down... I think?
Divider detail... this one is interesting... at this point I couldn't tell if it was just proud or if the joint wasn't tight... here's hoping...Gulp!
Ok now another 24hrs... had to go to work, but I was now ready to start planing down the surfaces and get this all cleaned up... or so I thought... Damn I have to sharpen my planes... so I took out my diamond stones and started to sharpen all 3 planes I was going to use... 1000 grit... 4000 grit... 8000 grit and then a little stropping on leather and the blades are ready. Now to plane the box... Damn how do I clamp something this big to the bench so it doesn't move... this way, NO! that way, NO... hmm? Oh I know I used a clamp down to the top of the bench and the bench vise to hold the clamp (wish I took a picture but I didn't). Ok started planing and found that ASH (wood I'm using) planes really easy as long as you go with the grain not against it, ( I think there is a phrase about this).
Ok now the pictures after the initial clean up... at this point I have only used planes and a little sandpaper to get to my initial cleanup... still will have lots more to sand once the whole thing is complete.
The Front, not too bad, most joints look good... maybe little gaps but I can live with that.
The Back, Oh good the joints look tight.
The Top, this worked out just as I thought it would, but I am now out of breath... and my shoulders are getting tired next time leave less material to flush up dummy...
Ah the Dovetails, actually most of them turned out really nice and tight, way better than I thought they would... but of course there is this one...Damn $#@%#$, son of a $^%@$@... Oh well it will stand there taunting me forever... FCUK!!!!! Any ideas on wood filler? This is how you know it was done by hand right? NO!!!! LOL all this aside I'm happy with the box so far and well there is nothing I can really do so be it!
I haven't decided what I will be working on next the Frame and Panel Lid or the Drawers yikes more dovetails... maybe the lid first then.
A little sneak peak at the Walnut veneer I will be using both for the lid panel and the drawer fronts... really cool stuff.
STAY TUNED!!!!
Monday, February 16, 2015
Tool Chest Build 04 - The Rails
Ok after I finished the horizontal dividers from the last post I moved onto the vertical rails. The tool chest has 4 vertical rails the back of the chest has 3 and the front 1, why? well the chest is divided into 3 sections, 2 drawers and a top section that will be accessible from the top lid.
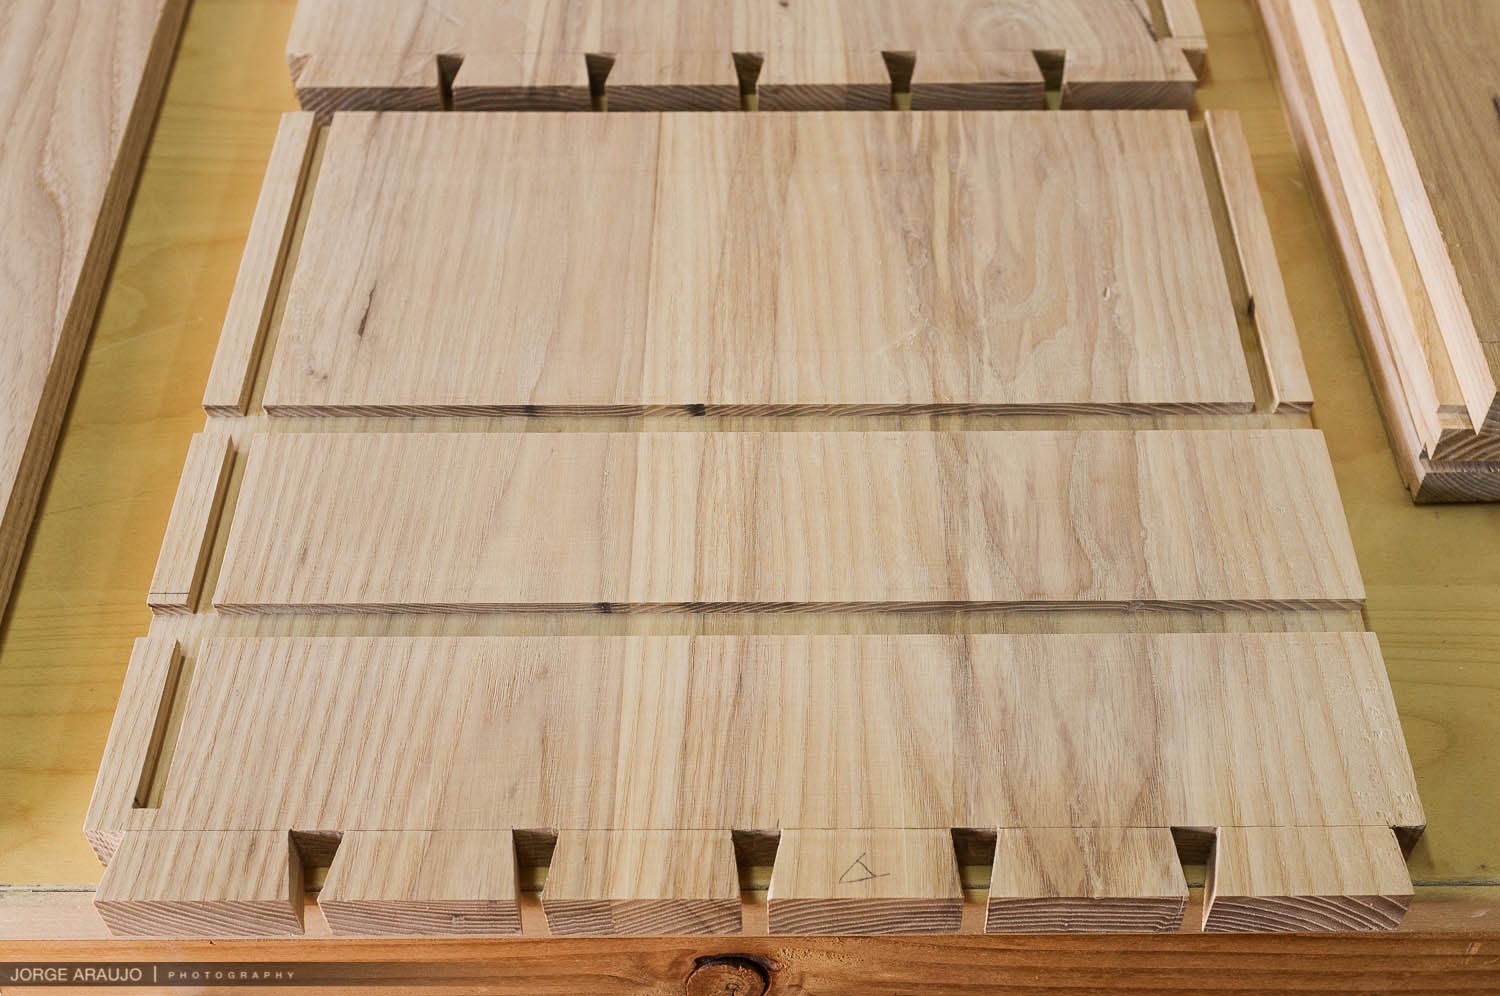
This picture shows the side panel with all the grooves cut into it. You can see the 3 sections and how only the back gets grooves for vertical rails because in the front the drawers will cover those areas.
This next picture shows how the rails get a rabbet cut into them that will fit in the grooves.
Here are the parts I am working on now. The sides and the rails.
Here is how the rails fit into the grooves and will look like they are just flush.
Here is how all the rails will fit into the sides... understand that this image doesn't have the horizontal dividers yet but shows how all this will look once the dividers are in the grooves.
With these rails done I now have all the main case parts below you can see starting from the left:
1) Bottom Panel with through dovetails joinery.
2) Horizontal Dividers (2) with sliding dovetail joinery.
3) Case Sides (2) has all the joinery needed, dovetails, sliding dovetails, dadoes for the rabbets.
4) Top Rails (2) the top front and back rails with rabbet joinery.
5) Bottom Rails (2) the back bottom rails also with rabbet joinery.
With all these parts now done, I can sand and then start the glue up. It's going to be a bit tricky because it all has to be done in the right sequence starting with the bottom panel dovetails, then the first back rail, then the bottom divider, then the second back bottom rail, then the second horizontal divider and last the top rails both front and back. I will be using hide glue because that will give me about 20-30 minutes of open time and I think that is going to be close. Update on how it went in the next post... Stay Tuned.
This picture shows the side panel with all the grooves cut into it. You can see the 3 sections and how only the back gets grooves for vertical rails because in the front the drawers will cover those areas.
This next picture shows how the rails get a rabbet cut into them that will fit in the grooves.
Here are the parts I am working on now. The sides and the rails.
Here is how the rails fit into the grooves and will look like they are just flush.
Here is how all the rails will fit into the sides... understand that this image doesn't have the horizontal dividers yet but shows how all this will look once the dividers are in the grooves.
With these rails done I now have all the main case parts below you can see starting from the left:
1) Bottom Panel with through dovetails joinery.
2) Horizontal Dividers (2) with sliding dovetail joinery.
3) Case Sides (2) has all the joinery needed, dovetails, sliding dovetails, dadoes for the rabbets.
4) Top Rails (2) the top front and back rails with rabbet joinery.
5) Bottom Rails (2) the back bottom rails also with rabbet joinery.
With all these parts now done, I can sand and then start the glue up. It's going to be a bit tricky because it all has to be done in the right sequence starting with the bottom panel dovetails, then the first back rail, then the bottom divider, then the second back bottom rail, then the second horizontal divider and last the top rails both front and back. I will be using hide glue because that will give me about 20-30 minutes of open time and I think that is going to be close. Update on how it went in the next post... Stay Tuned.
Tool Chest Build 03 - Sliding Dovetail Dividers
So after finishing the bottom panel dovetails to the best of my hand cut dovetail ability I dry fit it to see how well they fit together... and while there were some gaps, they weren't too bad and once the glue makes them expand a little they should look pretty clean... and will hold the bottom panel from ever falling out.
The closeup shows the fit.
and the dry fit looks good.... so far!
Ok now for the Sliding dovetail dividers. I decided to change the design a bit here, originally it was going to be through mortise and tenon joint for the dividers but I liked the idea of keeping it dovetails. As the dovetails in the bottom hold the panel from falling out from the bottom, using sliding dovetails on the dividers will hold the sides from ever opening out to the sides... Now I mentions why these joints were originally used to hold the parts from falling apart for to tell the truth with todays modern glues and the fact that this will never have enough force or weight applied to it all these joints are total overkill but its cool to know what they are there and truth be told with these joins like this I could put it together without glue and it would hold... but you are gonna have to take my word for it cuz I'm gluing it.
2 dividers so here is a closeups of the dovetail grooves on the side panel.
Here is what the side panels look like so far.
and here is with the divider slid into the groove looks like, its left a little proud so that it can be hand planed down smooth and flush once it is glued in place.
Ok well that is it for the dividers, learned an new technique as this was the first time I had ever used sliding dovetails. Next up I will be ploughing the groves in for the back and the front panels of the box.. Stay Tuned.
The closeup shows the fit.
and the dry fit looks good.... so far!
Ok now for the Sliding dovetail dividers. I decided to change the design a bit here, originally it was going to be through mortise and tenon joint for the dividers but I liked the idea of keeping it dovetails. As the dovetails in the bottom hold the panel from falling out from the bottom, using sliding dovetails on the dividers will hold the sides from ever opening out to the sides... Now I mentions why these joints were originally used to hold the parts from falling apart for to tell the truth with todays modern glues and the fact that this will never have enough force or weight applied to it all these joints are total overkill but its cool to know what they are there and truth be told with these joins like this I could put it together without glue and it would hold... but you are gonna have to take my word for it cuz I'm gluing it.
2 dividers so here is a closeups of the dovetail grooves on the side panel.
Here is what the side panels look like so far.
and here is with the divider slid into the groove looks like, its left a little proud so that it can be hand planed down smooth and flush once it is glued in place.
Ok well that is it for the dividers, learned an new technique as this was the first time I had ever used sliding dovetails. Next up I will be ploughing the groves in for the back and the front panels of the box.. Stay Tuned.
Subscribe to:
Posts (Atom)